| Make good PDF - Setting up your distiller (Windows workflow) | |
|
Like most software, using the default settings usually works. With Distiller, there are a few things that can be done to make the PDF creation process a smoother one.
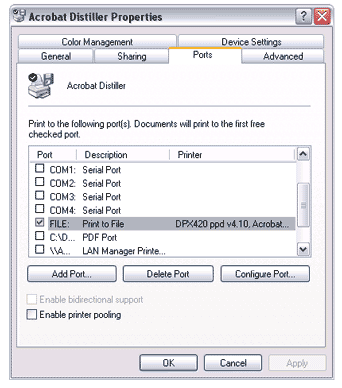
Depending on the operating system you have installed on your machine, the distiller settings will look different. Aside form the superficiality of this, there are no differences between the actual options on a WinNT, 2K, 98, ME or XP system, only where they hide. The first thing that I like to do when setting up distiller is to make the process semi-manual. Using the default options, when printing to distiller you are prompted for both a postscript file name and a PDF name. The default system will automatically open distiller and run whichever options are set as the default on your postscript file to create the PDF A problem that can easily arise here is having the end result a PDF that was screen optimised rather than print optimised. I always recommend only generating the postscript file (file that will end in either .ps or .prn) and running distiller manually. To do this a Port-change is required, a process that is far easier than it sounds. I'm writing this document between a WindowsME machine and a Windows XP machine but the screen shots are coming from my XP box. If you're still abusing Windows 98 I cannot stress highly enough that spending the $200-$400 to upgrade TO ANYTHING ELSE will save you the sort of time you can't put a dollar value to. I recommend XP Professional if you have anything over a Celeron 700 for stability's sake alone. Step 1 Access the Distiller Print setting through
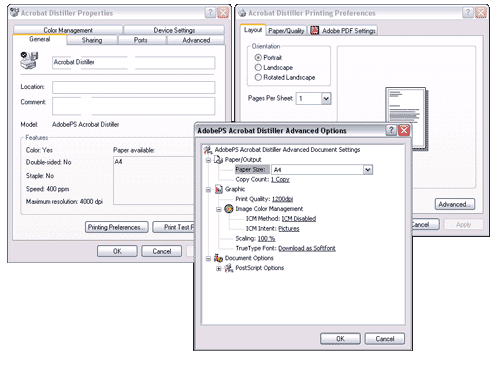
the Printers folder (Start-Settings-Control Panel-Printers) Now, when using Distiller as a printer, you will no longer automatically receive a PDF file as your end result. It's now up to you to make your PDF yourself. While you are in the distiller print settings, find the sub-menu"Adobe PDF Settings". Here is where the defaults are set. The main thing to look at first is that the "Do not send fonts to distiller" is UNCHECKED. We always want our fonts to go to distiller.
In printing preferences, press the advanced button and find the option to substitute true type fonts and change it to "download as soft font". This step is crucial. You can now OK your way out of the printing preferences and open Acrobat Distiller from the Start-All programs menu. Here a little more tweaking is required for optimal results. Remember that this is a process that you only need to set up one time on your machine. It does take time and will require some effort but the end result will be PDF files that work properly, contain the resolution you require and will be able to be viewed and printed by your target audience perfectly*. Now you need to manually produce your PDF I'll demonstrate this through the most common application: microshaft word.
|
* note: I take no responsibility if these instructions don't work on your machine. There is always the option to return to default settings. Problems may stem from the application producing the source postscript file and I do have the occasional problem file. This is neither a perfect or adobe-endorsed method, but it works far more often than it fails.
author: grant mcdonald www.indevelopment.org
 If
you want something done properly: do it yourself.
 The next important aspect is to turn off font substitution. Nothing
annoys me more when arial becomes helvetica, or times new roman becomes
times, or worse, something like gill sans or trebuchet MS becomes
courier.